Friday, March 22, 2013

Playing At Artsy Soul Wednesday

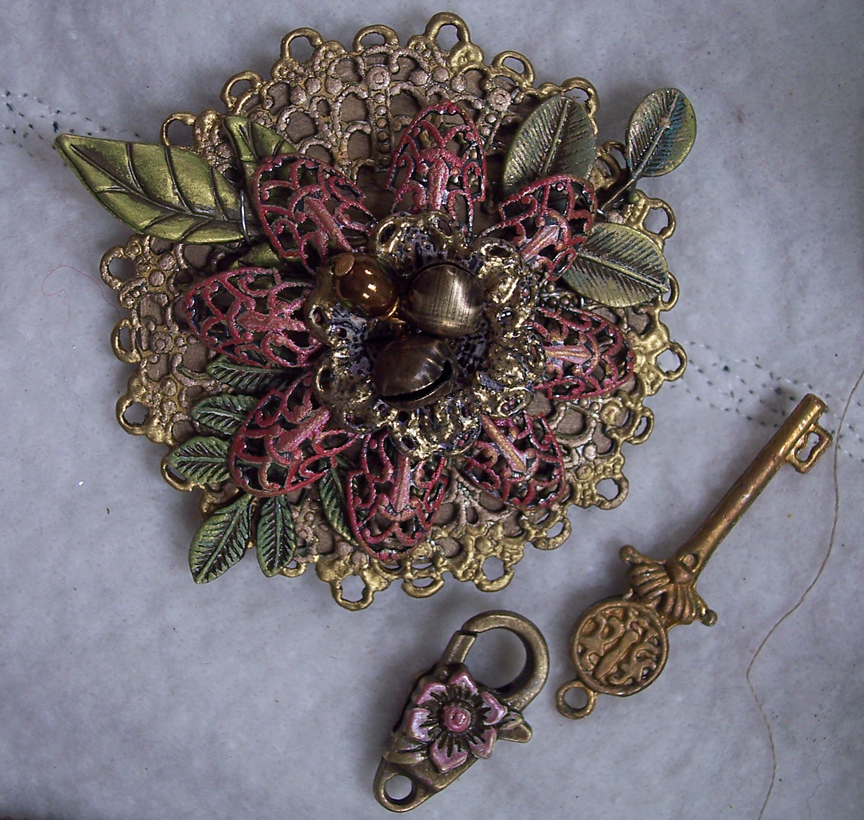
Wednesday, Diane I and I took a ride to The Artsy Soul for a little shopping and creative time with Colleen,  I have had this pin sitting on my workspace at home and just couldn't find the tine to do something with it, so I had a wonderful creative place to shop and get inspiration.  The pin is a wonderful bronze color with the writing in black.  I added some cream gilders paste, Inca gold gilders paste and Rose Inca Gold on the love and the little tiny hearts.  I then covered it with Judikins Glaze and imbeded a little tiny pink stone in it. Love is from clay Colleen sells (sorry, don't know the name of it), a mold I got at Michael's/AC Moore (available for use in the shop).  Painted them with Inca Gold precious metal Gold and then Inca Gold Rose.  They are glued to a piece of Rayon hem tape (seems to be the latest craze!) that was colored with Dried Marigold Distress Stain.  The key wtarted life as silver - Victorian Gold Ranger Patina took care of that!  A little African bronze Gilders Paste added some age and Inca gold Rose on the flower.  The beautiful lampwork beads and the head pin are from the shop.  Also made the rose from a mold sold at the shop filled with beautiful small flowers.  The heart bead is colored with Ranger Patinas and then a little Inca Gold Gold.  It is on display at the shop so stop by and take a peek and and I know you will want to make one.  There are lots of different pins and keys and other charms to use too!  You can find everything to make this or one like it at the shop!

Tuesday, March 12, 2013

Beautiful Day - New Tunnel book

I had so much fun making my Twilight tunnel book, thought I would make another, this one titled "Beautiful Day".  I wrote the short poem for a needlework piece I designed years ago.
 This is the cover closed.  Use Sizzix Cabinet Carn die and the smaller Movers and Shapers.  The bird is clay colored with Gilders Paste, Inca Gold and Perfect Pearls.  The title frame is embossing powder over white glue.  Love the texture it creates.  The Sun corona is soda can cut with My Favorite Things Doily die (LOVE THEM!!!!).  The embossing is Sizzix/Tim Holtz Folders.  Next Pic is the with the front "door" open so you are looking through to the last page moon.  Inside the door is a clay Sun with a tiny clay butterfly, metal charm butterfly on top and Metal tape over Grunge paper on the bottom, embossed with Vintaj/Sizzix Folder and colored with Distress Markers and then clear embossing resin, Fluxe by Judikins.
The first page open.  The tree is Cut from Sizzix Alterations die.  The face is a stamp, the wings are a printout.  The flowers are painted lace, the leaves are Grunge paper and Vellum (which gets VERY brittle) with distress inks and Distress Rock Candy Crackle Paint.  The fern branches are from the same.  The pic and grass are Dresden Paper with Inca Gold Rose and Lime green painted on them.
Birds are cut with various Sizzix dies from Chipboard.  The paperdolls (aren't they Soo cute!!) are cut with a My Favorite Things die and are printed paper over chipboard.  Yes those dies cut Chipboard  The tight rope walkers and the balloon are stamps by My Minds Eye.  The rainbow of flowers are pinched from vellum colored with  oil paint (which makes the vellum a bit more transluscent) then Perfect Pearls to add some sparkle.  The laces on the bottom were colored with ??? - they were in my stash and probably colored for a Crazy Patch project.
Lst open pages.  the small houses on the left are punched from small dot and plaid papers then stamped and embossed, and covered with clear Fluxe.  The sun Corona is made from a Sizzix Alteration die that is actually snowflakes.  This is three cuts colored with Distress or stains.  The cener is Dresden paper.  The Moon is clay, the corona another Doily cut from a Soda Can.  The houses lucite from Maya Road. 
Here is the front and back.  The back letters are Viva Decor Glitter Paste.  LOVE That.  The embossed image is a Sizzix Folder and embossed with silver embossing powser.  The shades in it were achieved by using both black and clear perfect medium pens.  Love that effect!  The book is bound with Distress Stained organza ribbons and pony beads.
 
Here is the poem:
Natures Wonders
Heavenly Sights
Color our Days
Brighten our nights.
The original needlework piece.

Friday, March 8, 2013

Green Book Details

I thought I would share some of the details on the Green book.  These are also new items from The Artsy Soul and I just LOVE them.  I can see lots of possibilities for using them on dolls too!  First is the open/close lock.  this one has a flower on it  but there are lots of different ones - with a heart, cross, to name a few.  The Key is also from the shop.  Just a touch of Gilder's paste (hard to see the flower is actually pink!) and Inca Gold Rose.  This lock has a ring at one end and the larger ring opens wit a lever.

Now on to the charms.  The book has 8 tails so 8 charms.  I used metal flower buttons on the top and threaded two stands through each one to hide the knots.  They are also colored with Gilsders paste and Inca Gold.  The charms are from left to right:  Clay flower - notice the bail on top - also from the Artsy Soul.  Love how easy it maked creating charms from different things.  Also easier than adding a jump ring (for me anyway!) Next is one of the new leaves with some Judikins embossing powder to add color, a brass charm I had with Patina Gilders paste, another clay flower, this one a rose, embossed metal disc (used a Vintaj embossing folder) with more Judikins embossing powder, another metal disc, the blue flower is from a bracelet given me by my dear friend Victoria Adams Brown, and the last item is a small metal butterfly with bail and Gilders paste color.  This was from the clearance section at either Michael's or AC Moore.

Wednesday, March 6, 2013

DONE!


Well 98% - waiting on two clay charms to dry.  Still room in the class - would love to see some of you on Monday, March 11, 2013 at the Artsy Soul, 59 N. Main Street, Manahawkin, NJ 609 549-6350!  Call, get more info.  Come and be creative!

Another Metal Book Class Sample

When I created the Copper Fleur de Lis book, I loved using embossing powders to create color and texture.  I am teaching this class again on Monday and decided to do a sample for those who may not be into the grunge thing.  Also gave me a chance to play with some of the new items Colleen has in her store, The Artsy Soul - some new to me and some new to the store.  The first thing I did was create the cover and the book.  I tried a new process so the fabric doesn't shrink and it dries faster.  Also didn't want the chipboard to warp.  This time, I glued the cover together then used sprays on teflon sheet to dip the book in.  A little misting of water and the colors spread really well.  It all dried with a little bit of ironing but no shrinkage, no warping, and the cover was done faster.  After that, it is time to get out the stencils and the embossing paste.  LOVE using that stuff!  Pages also done the same way so the watercolor paper dries much faster.  Of course, lots of stenciling with Viva Decor Embossing paste to act as a resist.  Also used Ranger dimensional paint which worked well too.


I embossed the soda can cut to size for the cover with a folder with a spray of leaves.  I then pushed shades of green embossing powders into the leaves and stems.  Then using Perfect Medium, added some of the new Ranger Gilded Gold embossing powder.  Love this!  Such a soft color and left some of the silver can show through.  Then I got really ambitious and covered the whole thing with Judikins Fluxe clear Enamel Resin  I mixed in a few drops of Latte alcohol ink to give it a yellowed/brown tint which softened the colors perfectly.  I added some lovely new bead caps that I bent to fit around the corners to finish the metal piece off.  Almost looks like clossionne.  Next was the center front embellishment.  These pieces, the backing filigree circle, the filagree flower and those awesome brass leave, small flower lock and the little bells in the center are all new to the store.  I used Gilders Paste and Inca Gold to color them.  So now to put it all together and decide what I am going to do with the spine and clasp!  Stay Tuned!

Friday, March 1, 2013

Working on new Project

Tim Holtz (http://www.timholtz.com) has a challenge on his blog to use the tattered floral die. Since this is one of my favorites and i have bags of precut fabrics (what else do you do with scraps????) I decided to make something. My friend at the Artsy Soul, (http://www.theartsysoul.com) has some fabulous new charms and such so I thought I would incorporate them into a little "doll" for the cover. I started with a premade journal from the cheapie bins at Michaels. I made a cover with muslin and stained it with Distress Stains. Cut out a bunch of letters with Sizzix (Tim Holtz alterations) Word Play die from chipboard covered with old book pages. After glueing them down to the muslin, coloring the words with distress stain and the rest of the letters with Tea Stain, I covered the whole thing with Clear Tacky glue (used half a bottle just for the front!) to try and even out the spaces. After the glue dried (within a few hours) I covered the whole thing with Distress Rock Candy Crackle paint with a few drops of Vintage Photo reinker added. I wanted the whole thing to look like it was shellacked. I went over the words with Distress Markers and a little Inca Gold Gilders paste. I colored the page edges with Distress Stain in olive then Tea Stain.