Tuesday, May 27, 2014

Doggies done!

Both sizes of the dog have been made!changed the ears and tail just because I could!  Now the tast thing is to make a hat for the 19" Mr.Cat.
Also finished the head.  I added a coat of clear gesso over the cloth because it does pill from the rubbing of the pencils.  No pilling, but not thrilled with the texture of the fabric coming through.  Used a damp brush to blend the pencils, which were watercolor for the most part.  Other than that, I can live with it.  Now to decide on who she will be!

Monday, May 26, 2014

Mr. Cat's Dog is done!

I needle felted the original dog and decided that wouldn't do for the pattern, so I used him to make a pattern and then created him out of a low pile fur fabric.  All hand sewn.  Now I need to make the smaller size and proof it.  Here is a pic of the two of them together.


I also took a small break and did a clay over on a reject Style head.  Not sure what I am going to do with her yet.  Just have her features sketched in.I should have flattened the nose, the head was sculpted, so I didn't have to use it as a base, then I could have made the nose narrower.  But Color will make a BIG difference!

Hope everyone is having a wonderful Memorial Day.  We are remembering our family members we lost recently who were veterans - My uncle who landed at Normandy especially.  We thank those who are currently serving too.

Saturday, May 24, 2014

19" Mr Cat Dressed

Mr. Cat (working title) 19" size is now dressed.  I decided to put him in Green.  His jacket is Moire Tafetta lined with Satin, his pants are tissue faille with grograin ribbon stripes down the sides of his legs.  I decided to give him hair unlike the larger version.  Now to give him a hat and his dog.  Have to trace the final pattern pieces, scan them in, then write the pattern!

Monday, May 19, 2014

Just a little more tweaking.

I reset her head, changed the tilt, darkened her hair so there is more contrast with her skin tone.  Also gave her new shoes with a clay sole.  Not very good with paperclay.  It cracked a bit. Kept changing shape as I fit it and added the stamped words, but like the final look.


Saturday, May 17, 2014

In her own Words

She is another Style doll only with joints and no armature.  I printed out the fabric using a word mosaic I created and my printer.  The bodice and first ruffle fabric I purchased for a quilt binding.  Love it!


Tuesday, May 13, 2014

Today's distraction

I was cleaning my work table a few days Go and found the ribbed turtleneck I cut off a sweater.  I thought if it unraveled easily it would make a great wig.  I tried a little, it did so I added color-it was white-and went on to Mr. Cat.  Here I am today, again clearing a spot and found a stuffed body for another Style doll.  I made a few just in case I wanted to do a pattern which would require lots of pics that I didn't take while making the original.decided I wanted to do a jointed version with the clay ever head and the unraveled turtleneck for hair.  So here she is.  Without hands but they will have to wait-no spare pair around. 
Romona, tomorrow and Thursday will be dedicated to Mr Cat.  Promise!

Sunday, May 11, 2014

Head done and on

Haven't put any"fur" on him.  Next is his clothes.
Since I don't have a cat and have never seen one of this breed up close and personal, I used this pic for inspiration.  Thinking I should have slanted his eyes more.  Think I'm going to put him in a derby.  Not sure what colors to dress him in.  Have to go through my stash.  Was thinking a dark purple velvet jacket for starters though pretty sure I don't have any!


Mr. Cat's Progress

Currently working on the 19" version of Mr. Cat.  Had this lovely buff shade of doe suede and thought I would try a Siamese type coloration.  I also made hi with the stretchgoing across - thats why he looks chubby.going to finish the head, need to finish coloring his features and add ears.  May add some"fur" made from brown fur yarn.   Better to make the clothes pattern with a fuller body  as we all know it is easier to take I than let out!

Thursday, May 8, 2014

Final picture I promise!

She now has a new rag doll. - twice the size of the first.
The original mini is in her purse.  Last pic I promise!  Thanks to everyone who commented and emailed me.  I really appreciated it and took each to heart.  Now on to Mr Cat!

Wednesday, May 7, 2014

Opinion Please

I made a small rag doll for Style of Her Own to hold.  I think I went a little too small!  She is less than 3", wears bloomers, a dress and apron.  Her shoes are painted on.  When I drew the outline, it looked OK but I think maybe she is too small!  Go Figure!  I hate working small!  How did that happen????

Here is a pic of her with Style so you can see the perspective.  What do you think?  Too small?

Tuesday, May 6, 2014

Style of Her Own finished for now

She is done for now - may give her a purse and maybe a little doll to hold.  Not sure if I am going to send her in.  Not totally happy with her shoes.  I wanted to put saddle shoes on her and I didn't have heavy enough white leather plus if I layered black over it for the sadle part, it would have been too heavy.  So, I looked around and used some pre-sized and primed white canvas.  Gave it another coat of Gesso then painted on the black.  I should have turned the top edge under but didn't and they gap a little in the back.The base is covered with another coordinate.  She went together because I must admit, I used some reject parts on her.  The armature was from the Matador that was too small as were the legs so she has really skinny feet - had to put some stuffing in the shoes to fill the toes out!  Not sure what I am going to do with her yet.  Maybe a pattern down the road.  Would like to do a leaner version without the armature too.

Monday, May 5, 2014

Style of her own

I
had planned on working on Mr Cat pattern but I spent half the morning looking for the draft pattern pieces.  I put them in a "safe place" when I started working on the Hoffman Doll.  I was a bit frustrated so decided to work on Style of her own - the fabric is very Mexican in colors and design so what better day than Cinco De Mayo?  So she is done for the day, still needs her accessories - hat, shoes and purse. And her hair is HOT Pink!  Found the wool in a bag I purchased in PA at the York Art Festival probably about 6-7 years ago. Once I start a doll I finish it.  But I did find the folder with all the Cat doll pieces.  24" doll pattern pieces are done, just need to  refine and scan,, add labels.  So now I will do the 19" size.

Saturday, May 3, 2014

Hoffman Challenge Doll 2014 Part 3

Here is he pretty much done though I am not happy with the soles of his shoes as I mentioned before so I will be repairing them and already have a solution in mind.  His hat is felt with a butterfly applique on the front. The real hats they wear appear to be made from a hard substance.  I found some from the 1700s made of cloth but shaped.  I decided to add the felt florets for the shape.  It looked like some of the older hats of the apprentices had something similar.  His name, El Mariposa means the Butterfly.  The challenge fabric has butterflies on it.  There is also a beaded butterfly applique on his cape which is sewed to the base. Various views.  Don't know why Blogger won't let me move the pics around!


Friday, May 2, 2014

Progress on the Matador Part 2

So I am off and running.  Made the head in cloth and hated it so did a clay/cloth over.  His nose is still large - need to work on normal size noses for men.  Chipped away at it a bit but still too long.   Had to redefine his brow twice before I was happy.  His mouth is crooked and bottom lip too big, but he sort of does look like one of the brothers.

.


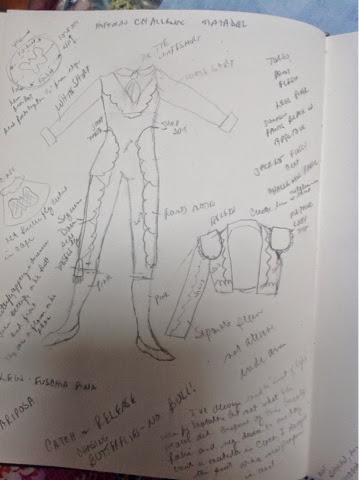
Next is the body.  I created the body and armature based on the size of the cloth head.  The head grows with the addition of the clay and now the body is too small.  So now a new armature, body and legs.  Created the legs with the hip and buttocks as part so when I attach them, he has a nice shaped behind if I do say so myself!  I placed the pieces so there would be an interesting design down his legs.  Did fussy cut the mandala on his chest.  Beaded it like crazy.  Started to bead down the side of the legs but the trim looked better.  Stepped back and the legs looked WAY too long, and also when I added the head, over the height limit by 1", so I pushed up his pants and hacked away 1" from his thigh.  The jacket was coming along though I am running out of that mandala and had to use a different one for the sleeves - and this from a yard of fabric!  And to add insult to injury, I ran out of two colors of beads.  Since I got them at my local bead store, off I went to get more only they didn't have them in stock.  Checked on line and couldn't find the color numbers.  I did have Chech beads in the same or similar colors to mixed them in.  At least the fronts and jumpsuit are all the same beads.


At this point I am thinking "what was I thinking!"  I am diametrically opposed to the purpose for the outfit, I think his legs are too thin, and not a great stuffing job on the lower legs!  But I continue on.  Once I got his hands on, I punched the armature through the one on his hip and had to redo.  Decided to just cut the wire off rather than try to bend it to my will.  I use a heavy 16g double hard stainless steel for the armature,  It is very stiff and strong and since I started using it, none of my dolls have come back misshapen.

I must admit I was getting very discouraged and thought that maybe I should cut my loses so I made a head for the little girl I am calling "A Style of Her Own" inspired by my good friend Colleen Athens.  I wanted the head to have a small pointed chin and rounded face.  First draft was not right so I did a clay/cloth over.  Second version chin a little too sharp, third one OK but not enough chin.  I like all three though but will do one more just to get the look I want.  May eventually create a pattern.
The matador is 95% finished.  Not really happy with his shoes and will remove him from the base for the second time to fix them.  Once I got his head, hair hat on, he was about 1/4" over the limit so I had to take more off his legs but I did take the time to restuff his lower legs and redo the trim around the leg bottoms.  I also fitted them better after I shortened them.  BIG improvement.  Finished pics in the next post.  So far, I have about 3 weeks invested in this project.  I also have been working on my Mr Cat pattern for a break from all this lack of progress.  I think he is more Matador meets Alexander McQueen!

My 2014 Hoffman Challenge Doll Journey Part 1

When I first saw the fabric, I thought immediately of Mexican Pinatas and Dancers.  The colors are wonderful and I love mandalas.  I drew out a few sketches, most of them destroyed and wasn't happy with any of them.  I didn't want to go for the obvious.  This one is for a wizardess.  
 
Then I saw a feature on 60 Minutes about 2 bullfighting brothers in Spain.  I in NO WAY condone or support Bullfighting in any way shape or form, but was totally dazzled by these two handsome young men and the dazzling "Suit of Lights" they wore.  I decided some day I wanted to make a  bullfighter doll - just for the costume.  I started researching the costumes and the postures.  First, the gentleme.
Then the pose I fell in love with though to fit on a base would take some tweaking.

Of course there could be no swords!  And this view too
So, I made a sketch and realize in NO WAY did the challenge fabric relate to my subject matter, but I proceded anyway.
And so began my journey to creating a doll that should be named "What Was I thinking??!?!?!?"