Tuesday, December 17, 2013

One more card but not the last!

Inspired by Colleens tiny doll with the cowboy boots.  Sorry, no pic.
 Now the saying.


Wait for it


Monday, December 16, 2013

Hostess Gift

 We have some wonderful friends who host a Holiday party every year.  This year we arranged for a sitter for my MIL so we could go together and stay-I usually only stay an hour.  Well, the snow kept us home, but we did enjoy the Brown Bottoms and Chocolate cream pie I made.  I also always bring a handmade hostess gift.  This year it was to be this bird house ornament.  The number is their house number.  It is made from chipboard and paper, cut with a Sizzix die.
 

Wednesday, December 11, 2013

more Cards and still more to go!

 Face is a digital image made from my tiny snow leopard doll.  made 12 of these.  Was trying a technique for the bachground using watercolor paper, dry embossing and gesso which I didn't put on thick enough.  But they came out ok.
 Snowman cards. Sizzix sie with embossing folder.  The tags in the had are mini ticket stamps from Red Lead.  53 done.  About 20 to go!

Finished Book now on Etsy

When I teach a class, I make a book or doll along with the students so I have one for demo purposes.  This is the Sketchbook Journal I made when I taught the class.  I usually leave the cover plain or with low embellishments because it is 5" x 7", small enough to fit in a purse.  I got carried away with this one.  The shrine is made from layers of chipboard, die cut, some dry embossed then colored with lots of products including Gilders Paste, Inca Gold, Acryllic metallic Paints.  The center of the shrine is paperclay as is the figure and the architectural elements.  The chain around the shrine is set in a niche I cut.  the cable around the center is actually twisted twine that was stained, painted, gilded then pressed in place - I left a small groove around the center.  The book cover itself if made from paper on canvas panels that form the base for the covers.  The spine is chipboard and linen.  I placed a piece of distressed leather over the spine, dry embossed and colored with all these wonderful products.  The part I love the most is the buckle clasp.  I formed a piece of 16g double hard stainless steel wire into a loop and covered it and 4 head pins with bronze apoxy sculpt.  I impressed with stamps, then enhanced with all those wonderful products.  The strap is from a heavy suede skirt, colored again with all sorts of things so it blended in.  It is now listed on Etsy in my shop, link on the left.  

Next Dozen

Was going to leave them white on white, but looked too bland.  Used some colored pieces left from last year.

Gelli plate games again!

was looking at the gelli plate blog   http://gelliarts.blogspot.com/ and came a cross two videos I had to try.  One involved making your own texture plate with canvas board and molding paste.  I really liked doing this but was a little disappointed with some of the results and found I needed to apply the paint very thin and not press the plate too hard for the impressions to be best.  I also wash my plates after and think I will seal them so they clean easier in the future.  Here are the plates and the results.
Plates using 5"x7" canvas boards.

Finished papers.
next was applying paint to the gelli plate, letting it dry, then pulling it up with packing tape.  I used clear glitter. Perfect pearls, glitter paste on the back side.  Now to figure out what to do with them.
The bottom has copper glitter paste and perfect learls powder.  I think that's my favorite.  Second has gold and micro pearl powders and rock candy glitter (used basting spray to apply glitter), third has gold precious metals paint and tarnished silver and dark purple mica powders.  I use both perfect pearls and pearled.  Found this worked best with perfect medium.  This was cheap tape and not that sticky.  I forgot what I used on the top one.

Friday, November 22, 2013

First group of Christmas cards done!

I used printed scrapbook paper for the backgrounds.  Bought these dies for $10 each at AC Moore.  They have their Own Embossing folders.  I am currently in a mono chromatic mood.  I did 16 of these, 4 each style as that's how manybackgrounds I an get from each sheet of paper.  Just waiting on  new stamps from Red Lead paper works to add the sentiment and maybe a tint tag or sprig of leaves to put in the doves mouth.  Next batch will be in colors.  The flower and bird are card stock wiyh perfect pearls/ pearlex powder or inca gold or paint highlights.  16 down, 50 to go! I'm thinking not everyone will get a handmade card this year!

Wednesday, November 6, 2013

Tuesday, November 5, 2013

Her Accoutrements

I have finished her hat, lorgnettes and fan.  She also now fas hair.  As I was getting ready to set har in the base, I realizes I had to redrillthe holes since she is not going to be holding a walking stick or parasol.  Grrrrr!  I already finished the base so had to fill holes with putty and repaint.  Don't you love waiting for paint to dry?  And this finish requires 5 separate layers- base coat, crackle medium,top color coat, clear crackle finish for more texture, and a finishing clear varnish.  So, here are some pics of her accoutrements.  First pic is all three.  Her fan is brass filigree discs cut spare and reassembled with a gear handle, her lorgnettes are gears wired together though I think I will make the handle shorter and add a chain for her wrist.  The hat started as a black felt bowler.  First I made it to match the lace but decided it needed to be dark like fer corset.  Another lesson in watching paint dry!  Then I had the feathers and clock attached but forget the wire springs!  But she will be done TODAY!


Sunday, November 3, 2013

Costume Done!

I finished her costume.  Just have to add to the heels on her shoes.  Now to add the props, base and on with her head?  Not sure of hair color yet.  I also decided to vary her pose from the pick.  Having her lean on a walking stick or parasol hod her outfit.


Thursday, October 31, 2013

Progress on Shabby Chic Steampunk doll

Her head is pinned in place as is her swag.  I am pleased with her shoes though I think I need to do something to define the heels.  I got that beautiful Cluny. Lace from two shops on Etsy, Little Red Cottage and Closet Treasures. I do have lots of Cluny, but all narrower than I needed.  I really love the two different laces together.  Next is her corset and I plan to make that. Out of metal tape witha copper patina finish.  I think she will have cuffs on the sleeves out of the same.  That beautiful embroidered floral lace was the color inspiration.  It was a gift from a very talented dollmaker Tammi VanderArk.  The copper lace trim on her boots is the same lace on her bodice and swag but dyed black, then painted with copper penny metallic paint.  I hope I made enough for her wrists and neck too.  Nothing like planning ahead!  She is also very snooty!  What a mood I must have been in when I did her face!
 

Saturday, October 26, 2013

Three days later, a face!

 
   This is why I hate clay! Takes so much longer, I hate to sand, and it can't use my beloved colored pencils and pens!  And this clay is soo soft!  I kept digging my nails ino it and having to fix, sand,paint, sand again!  Finished face though I may change the eye color - they are more grey than blue - and some in progress shots.  Now on to the costume!  Shoes first I think.


Wednesday, October 23, 2013

More work on steampunk diva

Body almost done.  Just need to sew the limbs in place and re sculpt the bust-the bottom and carpet cord I used broke!  I couldn't find my quilting thread which works so much better of me.  Need to sand (yuck!) the face though I will probably do a cloth over.  I need to even out the lips and nose.
  

Monday, October 21, 2013

New Doll in Progress Just Because....

I received this beautiful lace from Tammi in Michigan.  She used it on her Diva doll during class in May and I must admit I lusted after it! LOL  She so generously sent me a piece of it along with quite a few others that were just as pretty.  I decided I needed to do a new Steampunk version of my Diva Pattern.  I wanted to use Purple, Copper and Cream.  I also wanted to test this fabric I purchased at Joann's.  I bought a bolt (50 yds!) of Southern Belle Cream 200 ct cotton muslin.  It was only available by the bolt.  I have used it on the body, head, and hands (which I haven't turned yet) and so far so good.  Thank goodness!  50 yds will last a long time.  Here is a sketch and some of the fabrics I have pulled out for the doll.  The lace from Tammi in on the lower left, with the the purple flowers.  I think I'll do paperclay over on the face because I need the practice.


Thursday, October 10, 2013

Finished Journal

Finally!  Working on completing this so I could post but ran out of light yesterday - I only work in natural light - and I had to cook dinner!!!  So today, got up to work on this at 7 am, but the weather is so damp, nothing was drying without the help of an iron or heat gun.  But finally, here is the finished Journal (the peace sign is in honor of John Lennon who would have been 73 yesterday).  I like that this journal cover is fluid - I can add to it or have a guest add to it!  I was going for a NYC subway graffiti look though if I remember correctly, these tiles are more like the inside of the Lincoln Tunnel which are square.  But I think this works.  Embossed the paper with ink on the embossing folder.  Added lots of product over the covers including gel medium, crackle paint, Inca Gold Old Silver paste, and cream gilders paste. following pics show how I created this.  Hope to see you in the class on October 29th at the Artsy Soul, 59 North Main Street Manahawkin, NJ  Class size is limited to 8 students.  I am showing only one possiblility for the cover, but it is only limited by your imagination.  If you plan on attending the class, drop me an email and tell me what you have in mind so I can be sure to have embossing folders and papers that would work for you.


Wednesday, October 9, 2013

Preparing for new Create an Art Journal Class

While at the Scrapbook show last Friday, I found these little brown kraft paper sketch books (they measure about 5"x 5").  I wanted to try a new layered technique to look sortof like grafitti.  I thought this would be a good option to use on the sketchbook I am designing for class.  Spent all of yesterday cutting up pages from 18" x 24" sheets of mixed media paper.   (acid free, nice weight)  Some of the pages will open from the sides, others from the bottom.  The books will measure 5" x 7" with a 2" spine and contain 8 x 2 sheets for each signature.  I wanted to allow for chunky pages so the book wouldn't expand too much.  Here is a pic of the "grafitti" experiment.  I used cardstock for this sample.  Layer 1 was distress ink, layer two was stamped with stazon black ink, layer 3 was matte medium sealer, layer 4 was done with stencils and distress ink and adirondack and dylusions sprays.  Layer 5 was crackle paint and the final layer more matte medium though I will use gloss varnish on future versions.  
I painted the spine of this little book with gold paint and attached chipboard to stiffen the covers.  Perfect for carrying in my purse.  The sketch books will have woven osnaburg covered spines and covers made from 5" x 7" canvaspanels.  I'll share a pic of the spine with pages attached later, and then the final sample.

Sunday, September 29, 2013

Camera VS iPad

I was down in Manahawkin Thursday morning and had the opportunity to photograph the sunrise.  I used my iPad initially but then ran and got my camera.  My camera is about 10 yrs old, 6.5 mP, but still takes great pics IMHO.  Here is the same shot, Can you tell which is which?  Disclaimer:  I did use a time lapse with the camera, aperture preferred.  I used the deck railing as a tripod. Not sure which one was taken first as I was going back and forth but looking at the sun on the horizon, I think the top was taken first


Camera on top, iPad bottom.


Saturday, September 28, 2013

Halloween Paperdolls!


I purchased the Sizzix Die, Garden Fairy, Movable by Susan Tierney.  I thought it has lots of possiblilites and I wasn't wrong!  It measures about 10" tall completed.  The paperdolls received such a warm welcome, they are going to be a class at the Artsy Soul in October.  Here are the samples, made from chipboard, paper cut from the die, fabric, crepe paper, embellishments  and printed faces from stamps and
my own renderings.  Aren't they cute?  Lots of fun!

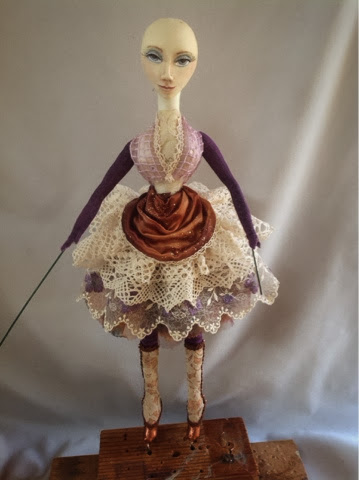
I am also in a Butterfly Doll Swap and thought this would be the perfect starting point.  I made her out of fabric with a stiff felt base.  Her face is  one of mine, I scanned then reduced and printed on fabric.  Her skirt is fused fabric also die cut with sheer silk crepe chiffon between the layers. Her crown is cut from a soda can.  Her scepter is molded from paperclay as are its wings.  Colored with markers and various mediums then coated with Judikins Glaze embossing powder.  When molding the charlotte, I put a doll needle inside to create the hole so I could put wire in it, but when she air dried, I couldn't get the darn thing out!  So, a bead is covering the eye! She was mailed off today.  Hope whoever gets her likes her!

Monday, September 9, 2013

Halloween Book Finished!

I completely finished this mini book done originally for the mini book challenge in the yahoo mixed media group I belong to but there was so much interest, I will be doing it as a class at the Artsy Soul (59 N. Main Street, Manahawkin, NJ 609 549-6350), September 12 (next week!) and September 22.  I'll attach the flyer for more into.

Here are the pics.  I used lots of die cuts from Sizzix, a few stamps, frames cut from decorated printed paper though we will be making our own in class but we will be adding "glass" with a vintage mirror look achieved with a new product by Deco Art.  VERY COOL!!!!  The pics I used are of my witches and ghouls dolls but I am encouraging the students to bring family pics.  Starts with the covers pic.  Lots stuffed into this 3" x 3" book!  But fun!  Need a tiny spider punch I think to add some finishing scarieness.